Special occasions call for a touch of elegance and sophistication, and what better way to elevate your look than with stunning nail art? From weddings and birthdays to graduations and parties, the right nail design can complement your outfit and serve as an expression of your personal style. Whether you prefer understated designs or bold statements, this comprehensive guide will explore a variety of elegant nail art options suitable for any special event.
The Importance of Nail Art for Special Occasions
Nail art is not just an accessory; it is an essential component of your overall look. Well-manicured nails can enhance your confidence, elevate your outfit, and make you feel polished and put together. Here are a few reasons why nail art is significant for special occasions:
1. Complements Your Look
Nail art can beautifully complement your outfit. A well-coordinated color scheme between your nails and attire can create a cohesive and harmonious appearance. Nail designs can also add an extra touch of sophistication to your overall look.
2. Self-Expression
Nail art is a form of self-expression. Choosing a design that reflects your personality or mood can make your outfit feel more authentic and true to who you are.
3. Adds a Touch of Glamour
Special occasions often call for glamour, and nail art can achieve that effortlessly. Whether you opt for intricate designs, glitter, or metallic finishes, your nails can add that extra sparkle to your ensemble.
4. Memorable Accent
Nails can serve as a memorable accent to your look, drawing attention and compliments from friends and family. Unique or eye-catching designs can make a lasting impression during events.
Elegant Nail Art Styles for Special Occasions
Whether your event is formal or casual, there is a nail art style that will suit the occasion. Here are some elegant designs to consider:
1. Classic French Manicure
The classic French manicure is timeless and exudes elegance. This design features a nude base with white tips and is versatile enough to suit any occasion.
How to Achieve It
- Prep Your Nails: Clean, shape, and buff your nails to create a smooth surface.
- Apply Base Coat: Apply a clear base coat to protect your nails and enhance polish adhesion.
- Nude Polish: Apply two coats of a nude or pink polish and allow it to dry completely.
- White Tips: Use a fine brush or nail tape to paint the tips of your nails white. You can also use a white polish pen for precision.
- Finish with Top Coat: Apply a clear top coat to seal your design and add shine.
2. Elegant Ombre Nails
Ombre nails transition from one color to another, creating a beautiful gradient effect. This design can be customized with your favorite colors and is perfect for formal occasions.
How to Achieve It
- Choose Your Colors: Pick two or three complementary nail polish colors for the ombre effect.
- Apply Base Coat: Prep your nails and apply a clear base coat.
- Dab with a Sponge: Use a makeup sponge to apply the polish, starting with the lightest color at the base of your nails and blending in the darker shades.
- Blend Colors: For a seamless transition, dab the sponge repeatedly until you achieve the desired look, making sure to blend the colors well.
- Top Coat: Seal with a top coat for a smooth finish and extra shine.
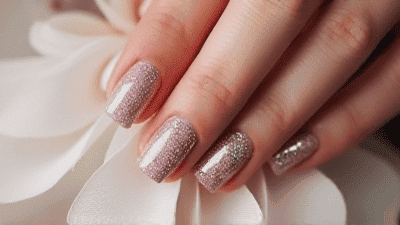
3. Glitter Gradient
A glitter gradient adds sparkle and glamour to your nails, making it perfect for celebrations. This design creates a stunning effect that draws attention.
How to Achieve It
- Base Coat: Prepare your nails and apply a clear base coat.
- Choose a Base Color: Apply a solid color polish as a base, allowing it to dry fully.
- Apply Glitter: Using a makeup sponge, dab glitter polish onto the tips of your nails, gradually increasing the amount as you work towards the tips.
- Blend: Blend the glitter down towards the base color, creating a gradient effect.
- Final Top Coat: Finish with a clear top coat to lock in the design and add shine.
4. Floral Nail Art
Floral designs are ideal for events like weddings, garden parties, or spring celebrations. They bring a fresh and romantic touch to your nails.
How to Achieve It
- Prep Your Nails: Clean and shape your nails.
- Base Color: Choose a soft pastel or neutral color for the base and apply two coats.
- Create Flowers: Use a fine nail art brush to paint small flowers in vibrant colors. You can create petals using dotting techniques or simple brush strokes.
- Add Details: Use a small brush to add leaves and stems, and apply tiny dots for added detail.
- Seal with Top Coat: Apply a clear top coat to protect your design and enhance shine.
5. Marble Effect Nails
Marble nails present an elegant and sophisticated look, perfect for formal events. This design mimics the appearance of marble stone and can be customized in various colors.
How to Achieve It
- Base Color: Choose a solid base color, such as white or light gray, and apply it to your nails.
- Dab with a Sponge: Using a sponge, dab on additional colors like black, silver, or gold. Use light pressure to create a marbled effect.
- Swirl with a Tool: Use a thin nail art brush or a toothpick to swirl the colors together gently, creating the desired marble effect.
- Top Coat: Finish with a top coat to enhance the marble look and protect your design.
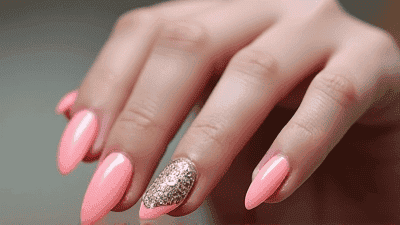
6. Metallic Accents
Metallic nails add a dose of glamour for special occasions. Incorporate metallic polish or foils into your designs for a chic and edgy look.
How to Achieve It
- Base Coat: Prepare your nails with a clear base coat.
- Apply Base Color: Choose a base color, such as a deep jewel tone or matte finish.
- Metallic Accents: Use metallic polish to create stripes, dots, or geometric shapes on your nails. You can also apply metallic foils for a more textured finish.
- Finish with Top Coat: Apply a top coat to seal your design and add shine.
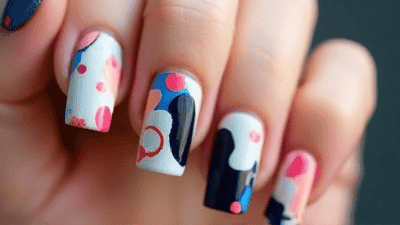
7. Abstract Nail Art
For those who love modern designs, abstract nail art offers a chic and artistic approach. This design allows you to play with colors and shapes for a unique look.
How to Achieve It
- Choose Colors: Select a palette of complementary or contrasting colors for the base.
- Base Coat: Prepare your nails with a clear base coat.
- Apply Base Color: Apply your chosen base color and allow it to dry.
- Create Abstract Shapes: Use a fine brush to paint geometric shapes, lines, and dots in various colors.
- Top Coat: Finish with a clear top coat to protect your abstract artistry.
8. Classic Red Manicure with a Twist
A classic red manicure is timeless and elegant. Add a unique twist by incorporating accents, such as gold foil or a matte top coat.
How to Achieve It
- Prepare Your Nails: Clean and shape your nails.
- Apply Base Coat: Use a clear base coat and let it dry.
- Apply Red Polish: Apply two coats of classic red nail polish, allowing each coat to dry completely.
- Add Accents: Use gold foil or glitter on one or two nails for an accent design. You can create stripes or small dots for added interest.
- Seal with Top Coat: Finish with a clear top coat for a glossy finish.
9. Whimsical Designs
For events like birthdays or casual parties, whimsical nail art can add a fun and playful touch. Consider incorporating playful patterns like clouds, stars, or even cartoon characters.
How to Achieve It
- Choose Your Colors: Select bright colors that evoke a fun atmosphere.
- Base Coat: Prep your nails with a clear base coat.
- Apply Base Colors: Apply vibrant base colors on each nail or alternating colors for a playful look.
- Create Whimsical Designs: Use a thin brush to paint cute designs such as clouds, stars, or stripes. Add tiny details and dots for character.
- Top Coat: Seal everything with a clear top coat for a finished look.
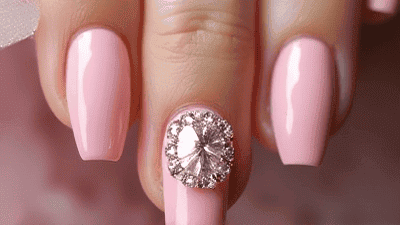
10. Pearlescent Finishes
Pearlescent or opalescent nail polishes provide a unique iridescent sheen, ideal for special occasions. This design works beautifully as it reflects light in various colors.
How to Achieve It
- Prep Nails: Clean and buff your nails to prepare them for polish.
- Base Coat: Apply a clear base coat.
- Choose Pearlescent Polish: Apply two coats of pearlescent polish in your chosen color.
- Optional Accents: For added elegance, consider adding small rhinestones or metallic accents to one or two nails.
- Top Coat: Seal your design with a glossy top coat.
Nail Art Tips for Special Occasions
To ensure that your nail art shines during your special event, keep the following tips in mind:
1. Plan Ahead
If you have a specific nail design in mind, plan ahead. Consider trying out your design a few days before the event to ensure it turns out as expected.
2. Match Your Outfit
When choosing a nail art design, keep your outfit in mind. Coordinating your nails with your clothing can create a well-rounded look.
3. Keep It Simple
If you're new to nail art, don't feel pressured to choose the most intricate design. Simplicity can be equally beautiful, especially for formal occasions.
4. Ensure Proper Drying Time
Allow each layer of polish to dry completely before applying the next coat or top coat. This prevents smudging and ensures a smooth finish.
5. Use Quality Products
Invest in high-quality nail polish, top coats, and tools. Quality products help ensure longer wear, better adhesion, and a more polished appearance.
6. Consider the Length of Wear
If the event lasts several days or requires a lot of activity, consider designs that will hold up well over time. Opt for durable polishes and consider gel nails for longevity.
Caring for Your Nails After Special Occasions
After your event, it’s essential to care for your nails to keep them healthy. Here are some tips to follow:
1. Remove Polish Gently
Use acetone-free nail polish remover to gently take off any polish, especially if you used glitter or gel formulas. Soak cotton pads in remover and place them on your nails for easy removal.
2. Hydrate
Apply cuticle oil and hand cream regularly to keep your nails and skin hydrated. This is especially important after removing nail polish, as it can dry out your nails.
3. Give Your Nails a Break
If you frequently wear nail polish, consider giving your nails a break to breathe. Allow a few days between manicures to promote healthy nail growth.
4. Maintain Nail Health
Regularly trim and file your nails to keep them in shape. Protect your nails by wearing gloves while doing chores or working with harsh chemicals.
5. Be Mindful of Diet
Incorporate foods rich in vitamins and minerals into your diet to support nail health. Foods high in biotin, protein, and zinc can help strengthen your nails.
Conclusion: Making Your Special Day Shine
Nail art is a fantastic way to add that extra touch of elegance to your special occasions. Whether you choose classic designs like a French manicure or more artistic styles like marble nail art, the right nail art can enhance your overall look and make you feel fabulous.
As you prepare for your special event, explore different designs that resonate with your personal style. Utilize the tips and techniques outlined in this guide to create stunning nail art that will turn heads and complement your outfit.
Remember that nail art can be a form of self-expression, allowing you to showcase your creativity and flair. So, indulge in the beauty of nail art, and let your nails shine as brightly as the occasion you’re celebrating. Happy nail designing, and enjoy your special day!